Product Design Environment. Let’s organize your Figma project.

Building the perfect design system
Physical products are built in a factory. This factory has to be clean and organized so everyone knows their way around and where to find the stuff they need to do their job. If the factory is in chaos, it’s going to slow down the work speed, increase risk of errors and reduce overall efficiency. As Product Designers, we have the job to create a workplace that is clear, understandable, practical and easy to implement. And I don't mean cleaning up the pile of mugs that has been on your desk for a week. I’m thinking of a digital space where we’ll build the product and where we can collaborate with other stakeholders. Kind of a digital factory.
So, let’s talk about organization. In this article, I will focus on the role of a good organizational strategy for Product Designers. I’m going to talk about creating a unified Source of Truth and give examples of how to organize your daily design work. But - there’s always a “but” - be aware that despite the general theories you’ll find here, a one-fits-all template doesn’t exist. Every project and every team has different challenges, needs and requirements. You can never adapt a solution, in the same way. But you can take the good practices, adjust and apply them in a way that will work for your project!
Why do UX/UI designers need to be organized?
When building a product, groups of designers, developers, and other stakeholders work together. To do it efficiently, everyone should know where to find the assets they need. Just as a factory worker knows which shelf the screws are on, a customer should know what to feedback and a developer needs to be aware of what to code. You can tackle this challenge by creating a single source of truth. Source of truth consists of physical elements like design files and design systems as well as theoretical elements like work agreements and project management spaces in which you describe the methodology of your work and the long-term strategy.
Regardless of the tool, a well-organized product design environment should meet several qualities such as consistency, reliability, efficiency, relevancy and, above all, accessibility. Using the single source of truth must be considered by everyone to be the easiest and best option. To meet the criteria you need to take full advantage of the possibilities provided by your design software. So make sure you implement styles, components, and a clear file setting.
A very important factor, that you always need to bear in mind, is scalability. From my experience, assuming that there will be only one designer in the project and that the product will remain small-scale, is a pitfall. You never know if the application will not grow so much that you will need to expand the team and the workplace. Preparing for this scenario early will save you much, much trouble.
So, how to prepare for that and make sure your environment is consistent, reliable, efficient, relevant and accessible? One word - STRUCTURE. Yes, in capitals. Because it is super important and without it you ain’t getting nowhere. Unless you want to run into the risk of duplicating the mistakes of your colleagues, losing a version and generating a chaotic environment that will be difficult to tame.
Dividing files and libraries
As the product complexity and the number of people involved grows, the file structure may also become more complicated. I'll talk about a couple of examples. None is better than the other. Depending on your needs, one approach will work for you and another might not. In a certain momentum while working on a project, even having a single file for all your stuff can be a reasonable option. There are several complexity levels, which result naturally from each other.
One file to rule them all

The first and simplest structure case. This approach is about keeping mockups and components all together. All designers work in a single file. While this is pretty convenient, it has also a downside - when someone modifies a component, it is updated immediately throughout the file. And it can sometimes result in unexpected problems or auto-layout crushes in the mockups, so it generates additional work in fixing these problems. To avoid such a situation, any proposed change to components should be discussed and agreed on with the design team. Make sure that everyone gets informed!
Separate component library
The natural successor to the single-file-approach is to separate the library from the mockup file. While working on mockups, designers use components that are already created.This solution gives designers less incentive to snoop around the design system and focus more on building from what's actually there - a solution that encourages systematicity. In addition, changes to the design system here work on an update basis. When we want to change something, we release a library update and the person working on the mockups has to confirm these changes. This prevents unwanted changes and greatly increases control over the design.
Many environments, many libraries

What when your application gets a native application in addition to the web version? Or when you have a couple of sub-brands? You will need to adjust the file structure. Mobile applications don’t use the exact same components as the web versions, but components of both products are going to have many common features. The solution to this problem is to split your components into many libraries. Then you will have one big design system, containing the foundations and the libraries for each product’s environment. The foundation library should cover common features for the entire product line, such as colors, text styles, icons, documentation, etc. And the rest that are based on foundation library, should contain components specific to the type of product’s environment, which is for example a web application.
You may ask now – isn’t creating and maintaining separate libraries too complicated? Can't we just make a bigger library? Well, it would cause similar problems as the ones described above, mainly unexpected changes, lots of chaos and even more effort to fix it. It is getting even worse when you consider the effect of scale. By separating libraries, you get more control over them. It is also easier to navigate through separated and well-described libraries than one gigantic library. Moreover, once additional environments appear, the number of artboards begins to grow and the performance of Figma will be dropping. And no one likes working on slow software.
Organizing your daily work. Where and how to keep in-progress files?
Here we go, with the world’s most beloved answer – it depends. Your focus should be on maintaining transparency of the progress status. So you need to figure out a system, how to keep everyone in the loop regarding what you are currently working on, what is implemented, and what is ready to be developed. There are different strategies for doing so and it’s best to establish it together, with the rest of your team. Make sure to create clear divisions so that no one has to think about whether they should do something or not. We need to make sure there is a consistent Source of Truth, for the designers as well as for the developers and everyone involved. So what can we do?
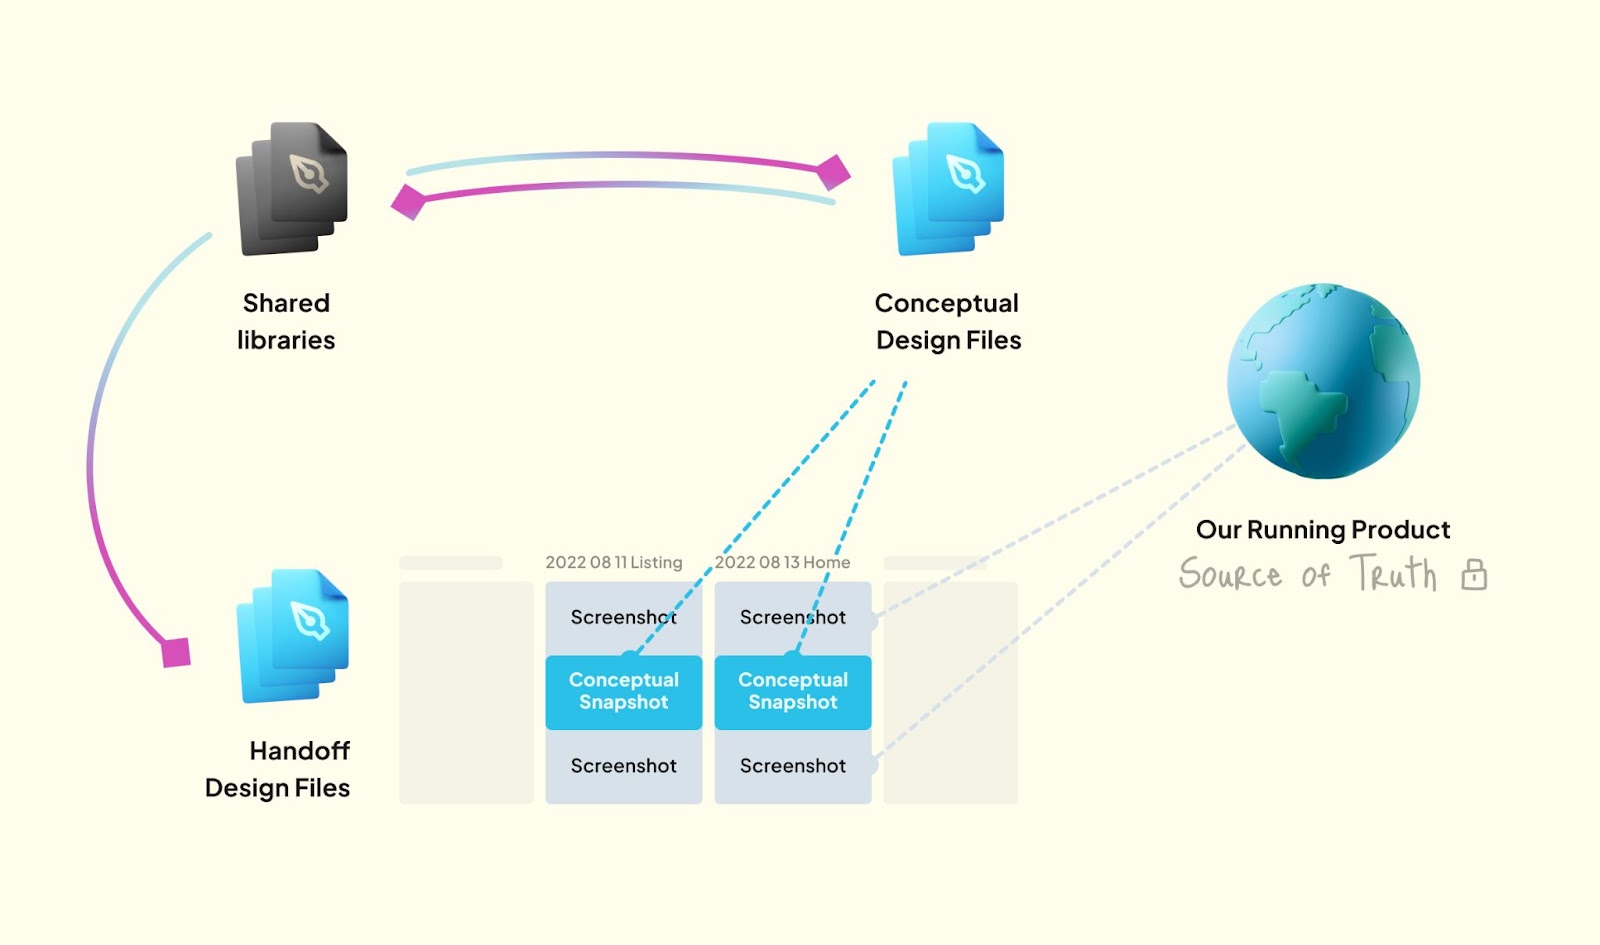
Keep in-progress files apart from handoff files
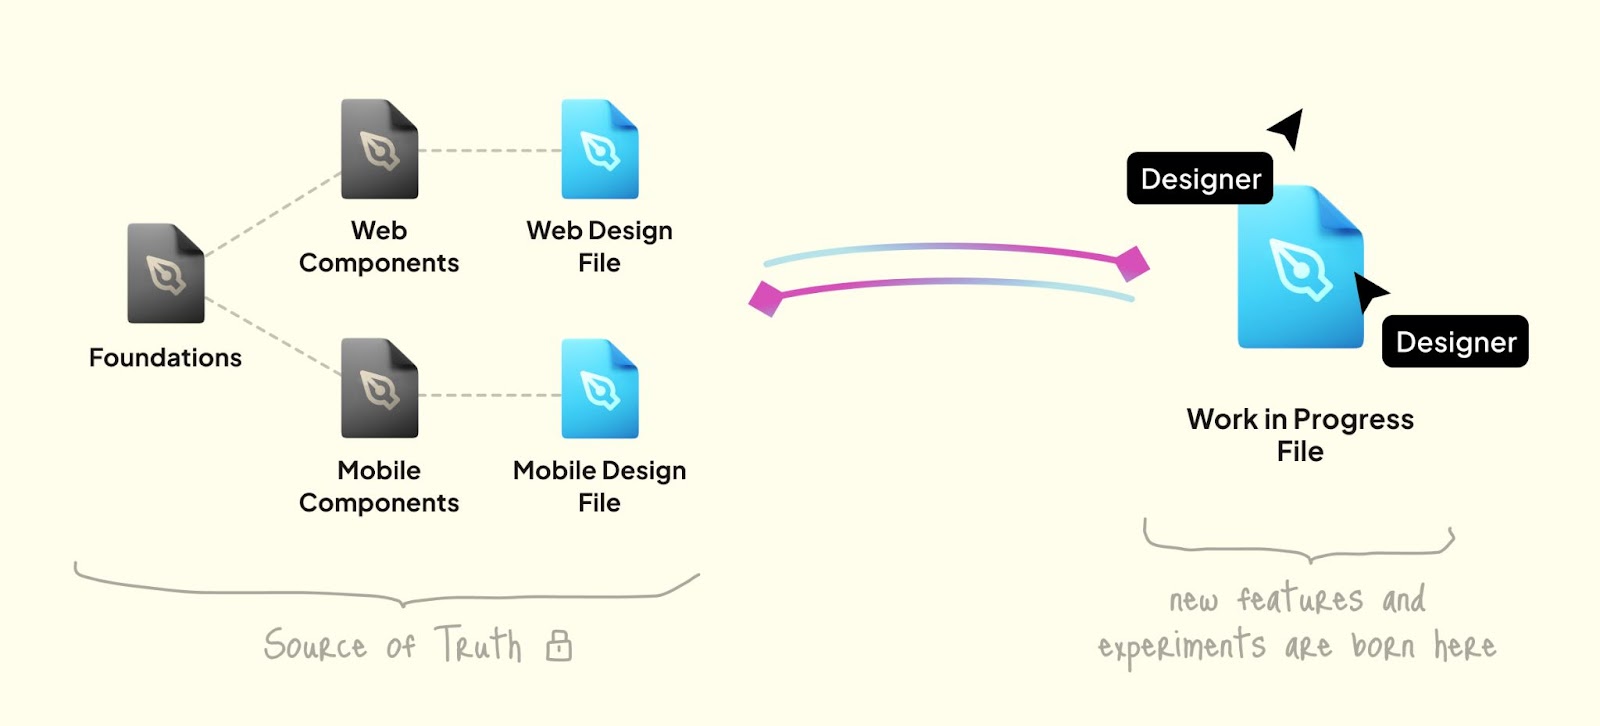
The obvious, and very often easiest solution, is to separate designs into ready-for-hand-off files (which are a source of truth for other stakeholders), and work-in-progress files. When you start working on new ideas, you create a new file, linked to your libraries and work on the concept with your design colleagues. When the feature is ready, you can transfer new elements to the handoff files.
The bigger, the more complicated it gets
The first solution is all fun and games until you get to work on a long-term project, with lots of dynamically changing variables. In this case, you’ll hardly ever have a single, easily defined state of your design. Some features will be delayed, others may come in many different versions for testing, and you’ll constantly have new learnings, resulting in new iterations. How do you put this in the Source of Truth?
Here’s a strategy that worked in one of my recent projects. It’s based on the assumption that the current state is always a deployed and running application. So, whenever we needed to refer to a source of truth, it was the deployed app and the design system. When we designed a new feature, we created a separate file, specifically for this functionality. Once we finished the conceptual work, we placed new elements combined with screenshots of the deployed app in the handoff file. This approach greatly increases awareness of the project’s scale and its current state among designers and non-designers as well.
Additionally, we can create an archive of changes from our iterations, arranged chronologically by date. This approach allows stakeholders to follow the changes within the project at a given point in time. It makes the overall awareness of the state of the art increase again which is invaluable when working in large teams on multi-year projects.
God save teams and projects
All those more complicated acrobatic figures would be impossible without these two silent heroes – teams and projects. What I'm about to write here may be obvious but let's give them one paragraph. These two above-mentioned allow us to provide the first level of structure in our project. Files function inside projects, projects inside teams, and teams inside the organization. Moving teams, projects or files between organizations requires contacting Figma support, whereas we have full discretion in other matters. We can, for example, create a team for our product "X", then inside the team create a project "Design system" and keep all the library files there. Later we can create another project for handoff files and another for experiments, etc. It's a lot of fun!
Branches - a useful design organization tool
Branches can help, it's true! This is a feature introduced some time ago to Figma, which allows you to control versions similar to those we know from Abstract (Sketch add-on). Branches allow us to create an alternate copied version of a file that is strictly dependent on its parent file and constantly updated by it. It makes it easy to work on changes and merge them when we are finished with the parent file.
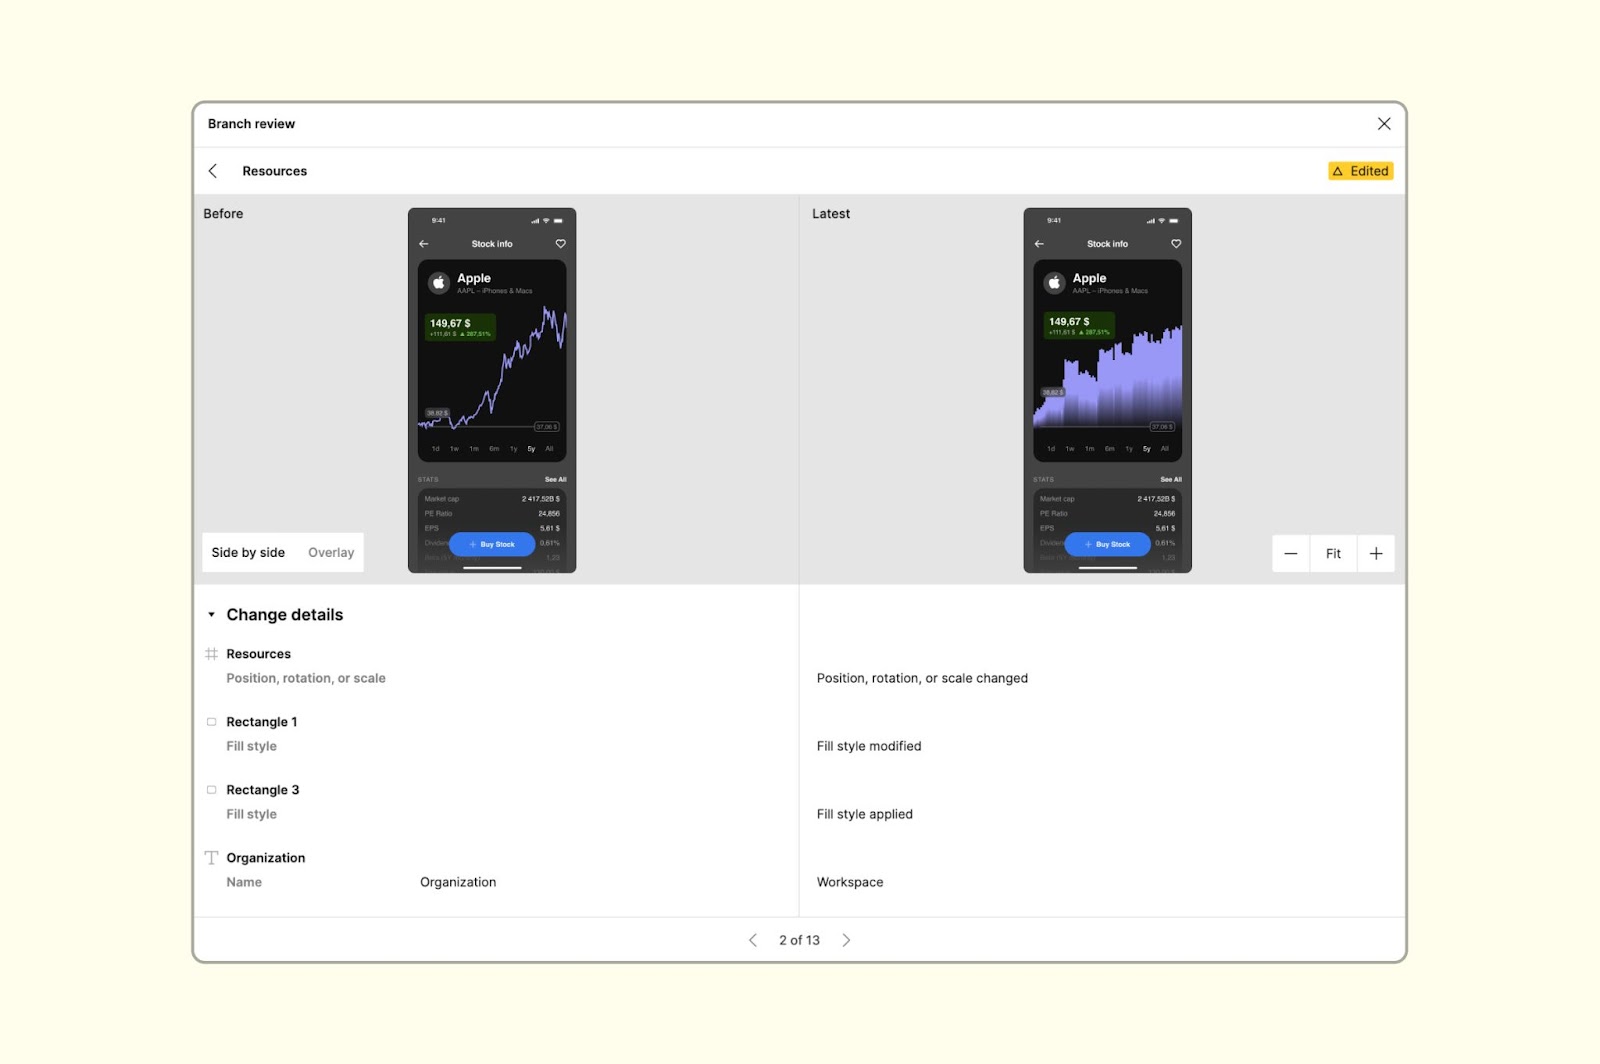
Branches also introduced a branch review manager when merging branches to parent files. We have a detailed view of all changes in the file, along with a comparison with the parent file, which is super useful since some of the smaller changes can be very easily overlooked.
Despite this, Branches aren't a perfect solution. Why? They aren’t easy to understand for every group involved, most likely because of their unclear structure. They are hidden inside the file and hardly visible. In the traditional teams-and-projects method, you can create a structure similar to folders that tout le monde uses, so the structure is clear and intuitive. With Branches, the possibilities are limited. You can’t edit the file and libraries at the same time, branches don’t cooperate with each other either.
How to use branches in a project?

When we use them the right way, they can come in handy! If we would hold the components along with the mockups in one file, we can use the full capabilities of this functionality. Branches eliminate the effect of messy changes so they reverse the rules of the game. They would allow us to create new components for our iterations if needed, which we wouldn't have to manually translate into a library after the ideation process – Things would happen automatically! Problems come with scale – we can't afford to keep so many components with mockups when the project is large enough for the sake of figma performance. But If the project is smaller or medium-sized, you can think about introducing branches at home!